> ## Documentation Index
> Fetch the complete documentation index at: https://platform.minimax.io/docs/llms.txt
> Use this file to discover all available pages before exploring further.
# Other Tools
> Configure the latest MiniMax M-series models in any AI coding tool that supports custom OpenAI-compatible or Anthropic-compatible endpoints.
If your tool has no dedicated guide but accepts a custom Base URL and API Key, use the values below.
## Configuration Reference
MiniMax exposes two protocols. Pick whichever your tool supports — most modern tools support at least one.
### OpenAI-Compatible Protocol
| Field | Value |
| - | - |
| **Provider** | `OpenAI Compatible` (sometimes called `Custom` or `OpenAI-format`) |
| **Base URL** | `https://api.minimax.io/v1` |
| **API Key** | [Get Subscription Key](https://platform.minimax.io/console/plan) |
| **Model ID** | `MiniMax-M3.1-Flash-Preview` |
### Anthropic-Compatible Protocol
| Field | Value |
| - | - |
| **Provider** | `Anthropic Compatible` (sometimes called `Claude` or `Custom Anthropic`) |
| **Base URL** | `https://api.minimax.io/anthropic` |
| **API Key** | [Get Subscription Key](https://platform.minimax.io/console/plan) |
| **Model ID** | `MiniMax-M3.1-Flash-Preview` |
## Which Protocol Should I Pick?
| Tool style | Recommended protocol | Typical env vars |
| - | - | - |
| Claude Code-style (TUI / CLI written for Anthropic) | Anthropic-Compatible | `ANTHROPIC_BASE_URL` + `ANTHROPIC_AUTH_TOKEN` |
| Cursor / Continue / Aider / OpenAI-format IDE plugins | OpenAI-Compatible | `OPENAI_BASE_URL` + `OPENAI_API_KEY` |
| Tools that ask for both | Either works — Anthropic-Compatible is recommended for prompt-cache benefits | |
## Cherry Studio
[**Cherry Studio**](https://github.com/CherryHQ/cherry-studio) is an open-source desktop client supporting 50+ LLM providers, with built-in MCP servers and 300+ assistants.
Install Cherry Studio per the [official docs](https://docs.cherryai.com.cn/docs/en-us/cherry-studio/installation).
Open Cherry Studio → click **Choose other Providers** → search `MiniMax`, then pick **MiniMax**.
Enter your [Subscription Key](https://platform.minimax.io/console/plan) (the API Host is prefilled), then click **Check** to verify.
Select `MiniMax-M3.1-Flash-Preview` from the model list.
## Chatbox
[**Chatbox**](https://github.com/chatboxai/chatbox) is a free, open-source, cross-platform AI client supporting advanced LLMs, custom API keys (BYOK), and AI agents across desktop, mobile, and web.
Install Chatbox per the [official docs](https://chatboxai.app/en/guide).
Open Chatbox → click **Settings** → click **Model Provider** → click **Add** → search `MiniMax`, then pick **MiniMax Global**.
Enter your [Subscription Key](https://platform.minimax.io/console/plan) (the API Host is prefilled), then click **Check** next to **API Key** to verify the connection.
Select `MiniMax-M3.1-Flash-Preview` from the model list.
## Xcode
[**Xcode**](https://developer.apple.com/xcode/) is Apple's official IDE for macOS, iOS, iPadOS, watchOS, and visionOS, now with built-in Coding Intelligence.
Install Xcode 26 or later from the [Mac App Store](https://apps.apple.com/us/app/xcode/id497799835).
Open Xcode → top menu **Xcode → Settings → Intelligence → Add a Model Provider**, choose the **Internet Hosted** tab, and fill in:
* **URL**: `https://api.minimax.io` (bare host, no path)
* **API Key Header**: `Authorization` (override the default `x-api-key`)
* **API Key**: `Bearer ` (the word `Bearer`, **a single space**, then your `sk-cp-…` key — [get one here](https://platform.minimax.io/console/plan))
* **Description**: `MiniMax` (any value)
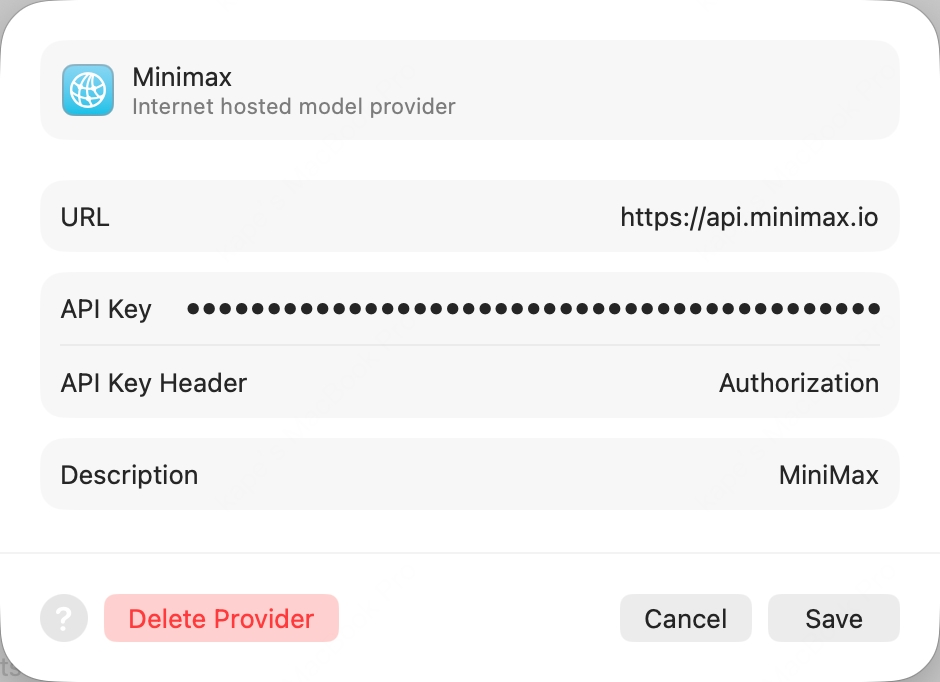 Click **Add**. Back in the Intelligence pane, open the new MiniMax provider and enable `MiniMax-M3.1-Flash-Preview`.
Open any project, press **⌘+0** to bring up the Coding Assistant, click the edit icon at the top-left to pick `MiniMax-M3.1-Flash-Preview`.
## Kilo Code
Click **Add**. Back in the Intelligence pane, open the new MiniMax provider and enable `MiniMax-M3.1-Flash-Preview`.
Open any project, press **⌘+0** to bring up the Coding Assistant, click the edit icon at the top-left to pick `MiniMax-M3.1-Flash-Preview`.
## Kilo Code
[**Kilo Code**](https://github.com/Kilo-Org/kilocode) is an open-source AI coding agent for VS Code, supporting multiple LLM providers and MCP servers.
First clear the `ANTHROPIC_AUTH_TOKEN` and `ANTHROPIC_BASE_URL` env vars — otherwise they will override the configuration.
Search `Kilo Code` in the VS Code Extensions panel and install.
Open Kilo Code → **Settings**:
* **API Provider** = `MiniMax`
* **MiniMax Entrypoint** = `api.minimax.io`
* **MiniMax API Key** = your [Subscription Key](https://platform.minimax.io/console/plan)
* **Model** = `MiniMax-M3.1-Flash-Preview`
Click **Save** then **Done**.
## Zed
[**Zed**](https://github.com/zed-industries/zed) is an open-source, high-performance multiplayer code editor written in Rust by the Atom creators.
Install Zed per the [official docs](https://zed.dev/docs/getting-started).
Settings → **LLM Provider** → **+Add Provider** → choose **OpenAI**, fill:
* **API URL** = `https://api.minimax.io/v1`
* **API Key** = from [M Plan](https://platform.minimax.io/console/plan)
* **Model Name** = `MiniMax-M3.1-Flash-Preview`
Click **Save Provider**. Then back in the LLM Provider list, click the new MiniMax entry, **re-enter the API Key and press Enter** to confirm.
Return to the agent panel, click **Select a Model** at the bottom-right and pick `MiniMax-M3.1-Flash-Preview`.
## Grok CLI
[**Grok CLI**](https://github.com/superagent-ai/grok-cli) is an open-source terminal coding agent that connects to xAI's Grok and OpenAI-compatible providers.
Not recommended for Agent workflows — use **Claude Code** or **Cursor** for best results.
First clear the `OPENAI_API_KEY` and `OPENAI_BASE_URL` env vars.
Run:
```bash theme={null}
npx -y mmx-cli@latest agent setup
```
Select **Grok CLI**. If it is missing, keep Grok CLI selected in the second multi-select. The wizard runs the official Grok Build installer, checks `grok --version`, preserves unrelated settings, and adds a MiniMax model to `~/.grok/config.toml`.
Run `grok` when setup finishes.
```bash theme={null}
npm install -g grok-dev
```
```bash theme={null}
export GROK_BASE_URL=https://api.minimax.io/v1
export GROK_API_KEY=sk-cp-... # from M Plan
grok --model MiniMax-M3.1-Flash-Preview
```
## Droid
[**Droid**](https://factory.ai) is Factory's official terminal coding agent that integrates with IDEs and developer collaboration tools.
First clear the `ANTHROPIC_AUTH_TOKEN` env var, otherwise it overrides the API Key in the settings file.
```bash theme={null}
curl -fsSL https://app.factory.ai/cli | sh # macOS / Linux
# Windows: irm https://app.factory.ai/cli/windows | iex
```
Add the following to `customModels` in `~/.factory/settings.json`:
```json theme={null}
{
"customModels": [{
"displayName": "MiniMax-M3.1-Flash-Preview",
"model": "MiniMax-M3.1-Flash-Preview",
"baseUrl": "https://api.minimax.io/anthropic",
"apiKey": "",
"provider": "anthropic",
"maxOutputTokens": 64000
}]
}
```
Launch `droid`, then `/model` and pick `MiniMax-M3.1-Flash-Preview`.
## Qwen Code
[**Qwen Code**](https://github.com/QwenLM/qwen-code) is Alibaba's open-source terminal coding agent optimized for the Qwen model family.
Linux / macOS:
```bash theme={null}
bash -c "$(curl -fsSL https://qwen-code-assets.oss-cn-hangzhou.aliyuncs.com/installation/install-qwen.sh)"
```
Windows (works in both Command Prompt and PowerShell):
```powershell theme={null}
powershell -Command "Invoke-WebRequest 'https://qwen-code-assets.oss-cn-hangzhou.aliyuncs.com/installation/install-qwen.bat' -OutFile (Join-Path $env:TEMP 'install-qwen.bat'); & (Join-Path $env:TEMP 'install-qwen.bat')"
```
Run `qwen` in your terminal. Pick **Third-party Providers** → **MiniMax API Key** → region **International**.
Enter your API Key from [M Plan](https://platform.minimax.io/console/plan) (prefix `sk-cp-…`) and press Enter.
The default model ID should be `MiniMax-M3.1-Flash-Preview` — press Enter to submit and start chatting.
## Open WebUI
[**Open WebUI**](https://github.com/open-webui/open-webui) is a self-hosted, open-source AI chat platform with offline support, RAG, and multi-model runners.
Install via Python pip (requires **Python 3.11** to avoid compatibility issues):
```bash theme={null}
pip install open-webui
open-webui serve
```
Open [http://localhost:8080](http://localhost:8080) in your browser and follow the prompt to create a local admin account.
Click the avatar (top-right) → **Admin Panel** → top **Settings** tab → left **Connections**. In the **OpenAI** row, click **➕ Add Connection**, fill:
* **URL**: `https://api.minimax.io/v1`
* **Auth** (Bearer mode): your API Key from [M Plan](https://platform.minimax.io/console/plan) (prefix `sk-cp-…`)
Click **Save** and back in the chat view, pick `MiniMax-M3.1-Flash-Preview` from the top model selector to start chatting.
## nanobot
[**nanobot**](https://github.com/HKUDS/nanobot) is an ultra-lightweight open-source personal AI agent CLI from HKUDS, with chat channels, memory, and MCP support.
```bash theme={null}
uv tool install nanobot-ai
# or: pipx install nanobot-ai
# or: pip install nanobot-ai # may need --user or --break-system-packages on macOS
```
```bash theme={null}
nanobot onboard
```
Replace `sk-cp-...` with your [Subscription Key](https://platform.minimax.io/console/plan):
```bash theme={null}
python3 -c '
import json, os, sys
p = os.path.expanduser("~/.nanobot/config.json")
c = json.load(open(p))
c["providers"]["minimax"]["apiKey"] = sys.argv[1]
c["providers"]["minimax"]["apiBase"] = "https://api.minimax.io/v1"
c["agents"]["defaults"]["provider"] = "minimax"
c["agents"]["defaults"]["model"] = "MiniMax-M3.1-Flash-Preview"
json.dump(c, open(p, "w"), indent=2)
' sk-cp-...
```
```bash theme={null}
nanobot agent
```
## OpenHands
[**OpenHands**](https://github.com/All-Hands-AI/OpenHands) (formerly OpenDevin) is an open-source AI software-development agent by All-Hands-AI, with TUI, web GUI, and IDE integrations.
```bash theme={null}
pipx install openhands
```
Replace `sk-cp-...` with your [Subscription Key](https://platform.minimax.io/console/plan):
```bash theme={null}
pipx run --spec openhands python -c '
import sys
from openhands_cli.stores.agent_store import AgentStore
AgentStore().create_and_save_from_settings(
llm_api_key=sys.argv[1],
settings={"llm_model": "openai/MiniMax-M3.1-Flash-Preview",
"llm_base_url": "https://api.minimax.io/v1"},
)
' sk-cp-...
```
```bash theme={null}
openhands
```
## LangChain
[**LangChain**](https://github.com/langchain-ai/langchain) is the open-source framework by LangChain Inc. for building LLM-powered applications, with model adapters, retrieval, agents, and tracing.
```bash theme={null}
pip install langchain-openai
```
Replace `sk-cp-...` with your [Subscription Key](https://platform.minimax.io/console/plan):
```python theme={null}
from langchain_openai import ChatOpenAI
llm = ChatOpenAI(
model="MiniMax-M3.1-Flash-Preview",
api_key="sk-cp-...",
base_url="https://api.minimax.io/v1",
)
print(llm.invoke("Hello").content)
```
TRAE
[**TRAE**](https://www.trae.ai) is ByteDance's AI-native IDE with intelligent collaboration and agent automation.
### Install and Launch TRAE
Go to [TRAE's website](https://www.trae.ai/?utm_source=content\&utm_medium=doc_minimax\&utm_campaign=minimax) to install TRAE
Click TRAE's icon to launch it. The following screen appears at TRAE's first launch
Click the Get Started button, TRAE's setup begins
For detailed installation steps, please refer to: [Trae Setup Guide](https://docs.trae.ai/ide/set-up-trae?_lang=en)
### Configure MiniMax API
**Important: Clear OpenAI Environment Variables Before Configuration**
Before configuring, ensure you clear the following OpenAI-related environment variables to avoid conflicts with MiniMax API:
* `OPENAI_API_KEY`
* `OPENAI_BASE_URL`
In TRAE, connect to MiniMax-M3.1-Flash-Preview with your M Plan [Subscription Key](https://platform.minimax.io/console/plan).
At the top right of the side chat box, click Settings icon > Models
Switch to the **Models** tab.
Click the + Add Model button. The Add Model pop-up appears
Enter Configuration Details:
* Provider: Select **MiniMax-Global**
* Model: Select **MiniMax-M3.1-Flash-Preview**
* API Key: Input your **[Subscription Key](https://platform.minimax.io/console/plan)**
Click the **Add Model** button
Pi
[**Pi**](https://github.com/earendil-works/pi) is an open-source TUI coding agent from earendil-works that talks to any provider through a unified LLM API.
### Configure MiniMax
Automatic Pi installation requires Node.js 22.19 or newer. Run:
```bash theme={null}
npx -y mmx-cli@latest agent setup
```
Select **Pi**. If it is missing, keep Pi selected in the second multi-select. The wizard installs the official npm package, verifies its version, and adds a MiniMax model to Pi's models and defaults.
Then launch Pi directly:
```bash theme={null}
pi
```
```bash theme={null}
npm install -g @earendil-works/pi-coding-agent
```
Export your [Subscription Key](https://platform.minimax.io/console/plan) (prefix `sk-cp-…`) and launch Pi:
```bash theme={null}
export MINIMAX_API_KEY=sk-cp-...
pi --provider minimax --model MiniMax-M3.1-Flash-Preview
```